Tutorial: Hosting your Next.js frontend on Netlify in 5 minutes (ssr)
Written by Knut Melvær
Missing Image!
If you followed the instruction of the first blog tutorial, you now already have a blog that can be hosted on any environment that runs node, be it Zeit’s now, Heroku or your own server (bless you!). But what if you wanted to host it on an awesome static site host like Netlify? Well, look no further, here is how to go about it.
Next.js comes with the ability to export as a static standalone app. Where Next.js works as a single page application with server-side rendering out of the box, such an export will build web pages as .html-files in folders, just like the old days. You will still get most of the features like prefetching and so on though.
If you just want go check out the code, you can find it on GitHub.
1. Add the export command to package.json
This feature is available under the command next export, which you will have to add to your scripts. I chose to make a new entry, called export, and chain it after the build step.
{
  "scripts": {
    "dev": "node server.js",
    "build": "next build",
    "start": "NODE_ENV=production node server.js",
    "export": "npm run build && next export"
  }
}
2. Tell Next.js where to get the page content in next.config.js
If you try to run npm run export you will get some error messages, among them telling you that No "exportPathMap" found in "next.config.js". Next.js will then try to build the pages from what it sees in the pages-folder, but since our blog.js expects a query parameter (that's is a slug from the URL) it will also fail. Next.js doesn't know (yet) what posts we have published in Sanity. So we have to configure Next.js to go look for those, before trying to export them. We start by adding a file to the root-folder called next.config.js. In this file, we'll put a configuration script and export it as a JavaScript module.
// next.config.js
/*
 * Let's reuse the client configuration. I have rewritten
 * it as a CommonJS module just to make it runs in a Node
 * environment without any fuzz.
 */

const client = require('./client')

module.exports = {
  // Make sure that your node enviroment supports async/await
  exportPathMap: async function (defaultPathMap) {

    const path = await client
      // get all the posts and return those with slugs
      .fetch('*[_type == "post"].slug.current')
      .then(data =>
        // use reduce to build an object with routes
        // and select the blog.js file, and send in the
        // correct query paramater.
        data.reduce(
          (acc, slug) => ({
            '/': { page: '/' },
            ...acc,
            [`/blog/${slug}`]: { page: '/blog', query: { slug } }
          }),
          {}
        )
      )
      .catch(console.error)
    return path
  }
}
This script will make an API call to your Sanity project, and get a list of slugs back. Here I use the wonderful ES6-function .reduce() to loop through all the slugs, and build an object of paths that Next.js, in turn, can use to generate the static pages. The object this functions ends up with looks something like this:
const path = {
  "/": {
    page: "/"
  },
  "/blog/hello-world": {
    page: "/blog",
    query: {
      slug: "hello-world"
    }
  }
}
This is a simple example constrained to just the blog posts, but as you might suspect, we could make far more sophisticated with standalone pages, different content types and nifty stuff using query parameters.
And that's pretty much it for the coding part. Test your script locally by running npm run export first. You should end up with a new folder called out, with an index.html file in it, in addition to two folders called _next and blog. Let’s put those on the web 🚀
3. Deploy your blog on Netlify
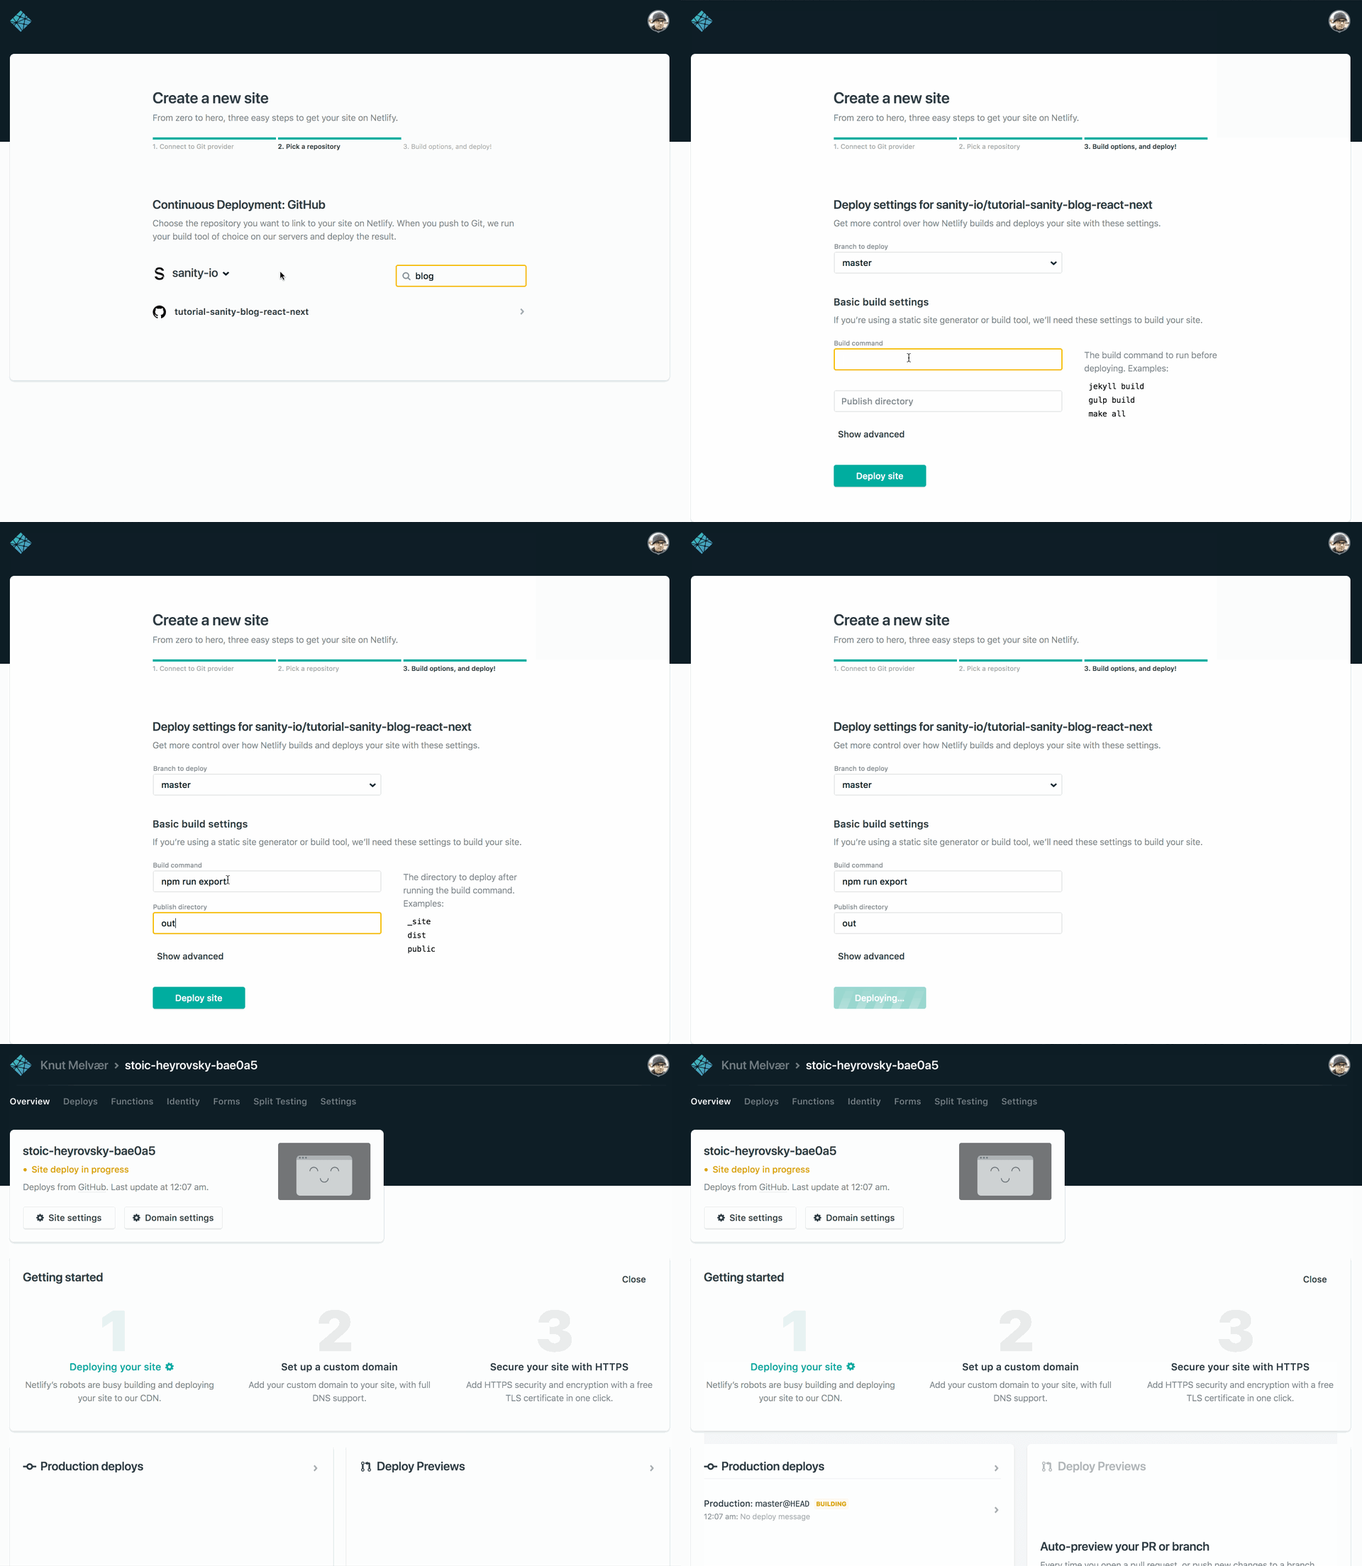
Push your code to a Github repository (or GitLab, or Bitbucket) and go to netlify.com. Sign in to a free account using your Github credentials (or some of the others if you prefer). Click on the New site from Git button. Click through the Git provider steps in order to find your blog repository and choose that. You'll now be presented with some few setup screens that looks like this:

Choose the branch you want to deploy from, and add npm run export as the build command and out as the publish directory. Click Deploy site when you've done this, and wait in anticipation while the build log scrolls in front of you. It can't be that easy? Yes, it can.
4. Add your blog URL to Sanity’s CORS settings
Hopefully, the deployment was successful and you're presented with a screen that tells you the project URL on Netlify and additional settings for your project. You can go ahead and choose your own site name on Netlify under Site settings, which will give you a new URL from the randomly generated one. Netlify also accepts your own custom domain if you prefer that. Either way, you have to take whatever domain you want to access your blog from, and add that to your Sanity project’s CORS-settings. Even if this is a static export, it seems that Next.js will do some client-side API-calls for prefetching and so on.
And that's it. You're good to go. Netlify has a couple of other nifty features to, such as webhooks, functions and even split testing. We get back to some of those in later tutorials, but do go explore!